 |
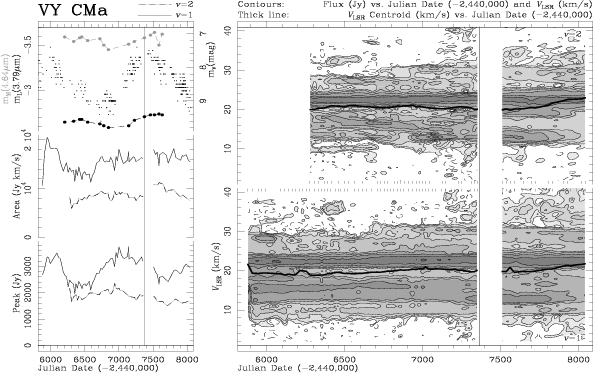
Figure 3:
Same as Fig. 2 for the red supergiant |
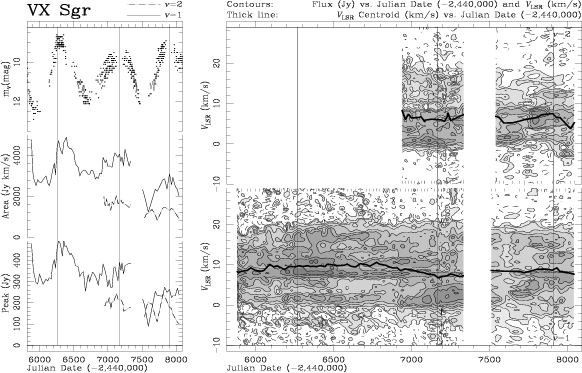 |
Figure 4: Same as Fig. 2 for the supergiant regular variable VX Sgr. v=1 contours: -10, 10, 25, 50, 100, 150, 200, 300, 400, and 500 Jy. v=2 contours: -10, 10, 25, 50, 75, 100, 150, 200, 250, and 300 Jy |
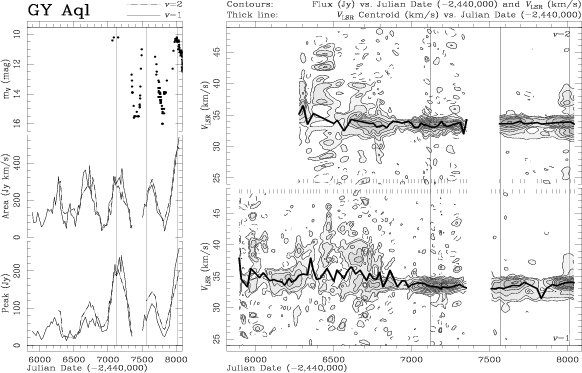 |
Figure 5: Same as Fig. 2 for the semiregular variable GY Aql. v=1 contours: -10, 10, 20, 40, 60, 90, 120, 160, 200, and 250 Jy. v=2 contours: -10, 10, 20, 40, 60, 90, 120, 160, and 200 Jy |
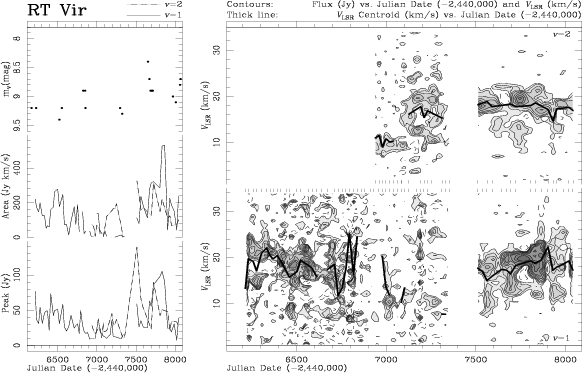 |
Figure 6: Same as Fig. 2 for the semiregular variable RT Vir. v=1 contours: -10, 5, 10, 15, 20, 30, 40, 50, 75, and 100 Jy. v=2 contours: -10, 5, 10, 20, 30, 50, 75, 100, 125, and 150 Jy |
 |
Figure 7: Same as Fig. 2 for the Mira variable R Aqr. v=1 contours: -20, 20, 40, 60, 80, 100, 150, 200, 300, and 500 Jy. v=2 contours: -20, 20, 40, 60, 80, 100, 200, 400, 600, and 800 Jy. As for the case of VY CMa, we have also displayed IR monitorings of this object in L' and M bands |
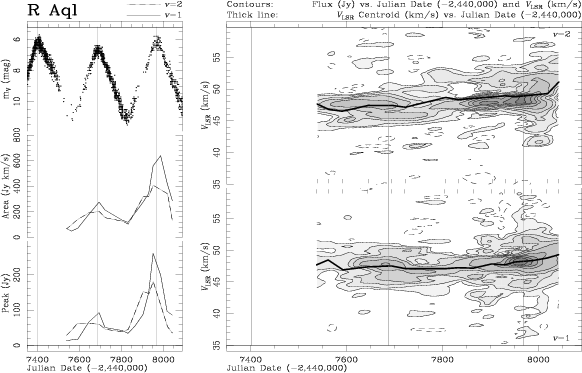 |
Figure 8: Same as Fig. 2 for the Mira variable R Aql. v=1 contours: -5, 5, 10, 20, 30, 50, 100, 150, 200, and 250 Jy. v=2 contours: -5, 5, 10, 20, 30, 50, 75, 100, 140, and 180 Jy |
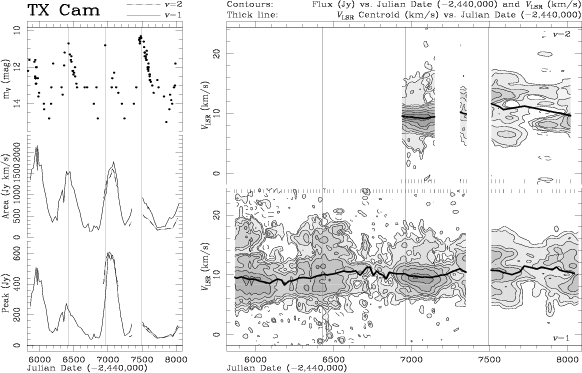 |
Figure 9: Same as Fig. 2 for the Mira variable TX Cam. v=1 contours: -15, 10, 20, 40, 60, 100, 200, 400, and 600 Jy. v=2 contours: -15, 10, 20, 40, 60, 100, 200, 300, 450, and 600 Jy |
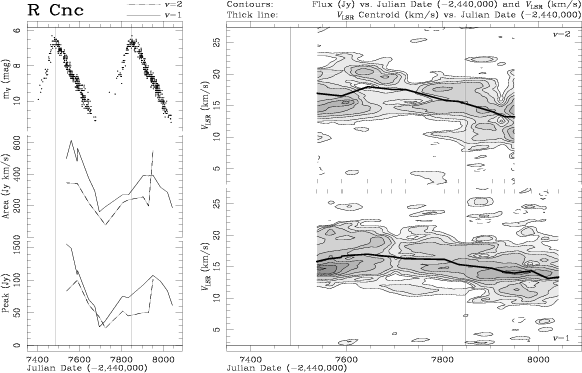 |
Figure 10: Same as Fig. 2 for the Mira variable R Cnc. v=1 and v=2 contours: -10, 5, 10, 20, 30, 50, 75, 100, 125, and 150 Jy |
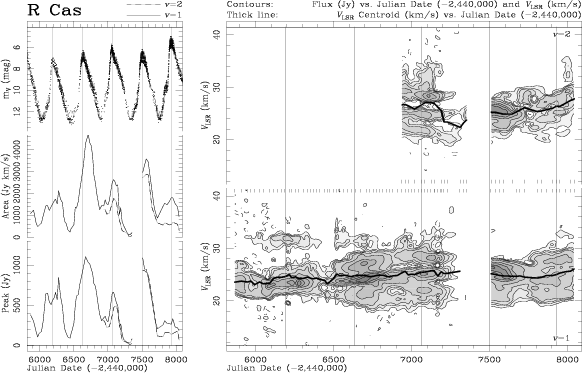 |
Figure 11: Same as Fig. 2 for the Mira variable R Cas. v=1 and v=2 contours: -20, 20, 40, 60, 100, 200, 400, 600, 800, and 1000 Jy |
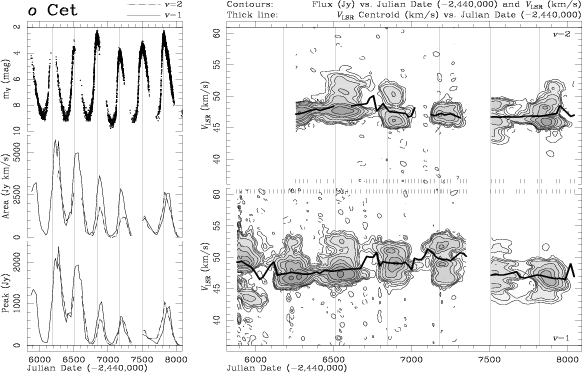 |
Figure 12: Same as Fig. 2 for the Mira variable o Cet (Mira). v=1 and v=2 contours: -20, 20, 40, 60, 100, 200, 400, 600, 1000, and 2000 Jy |
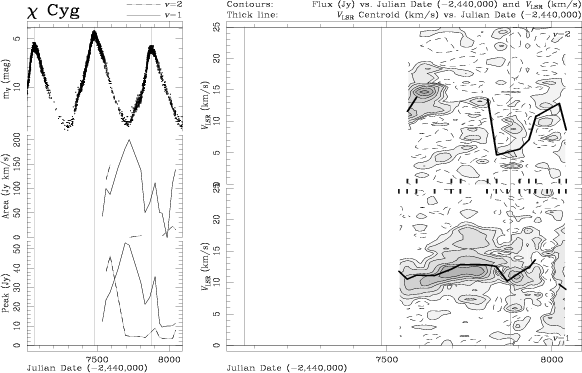 |
Figure 13:
Same as Fig. 2 for the S-type Mira variable |
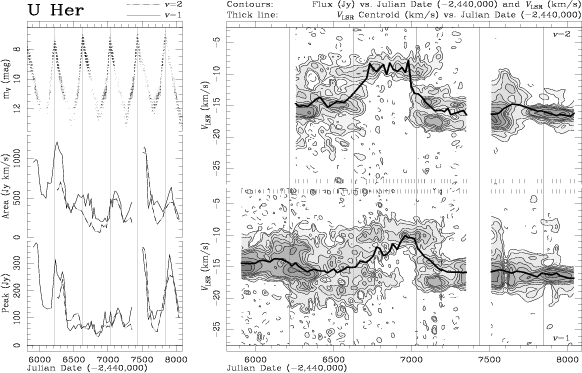 |
Figure 14: Same as Fig. 2 for the Mira variable U Her. v=1 and v=2 contours: -10, 10, 20, 40, 60, 80, 100, 150, 250, and 350 Jy |
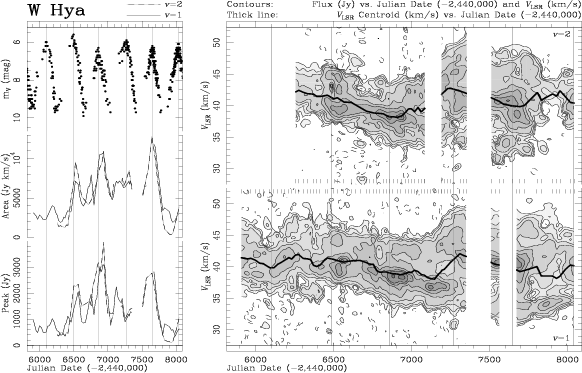 |
Figure 15: Same as Fig. 2 for the Mira variable W Hya. v=1 contours: -20, 25, 50, 100, 200, 500, 1000, 1500, 2000, and 3000 Jy. v=2 contours: -20, 25, 50, 100, 200, 500, 1000, 2000, 3000, and 4000 Jy |
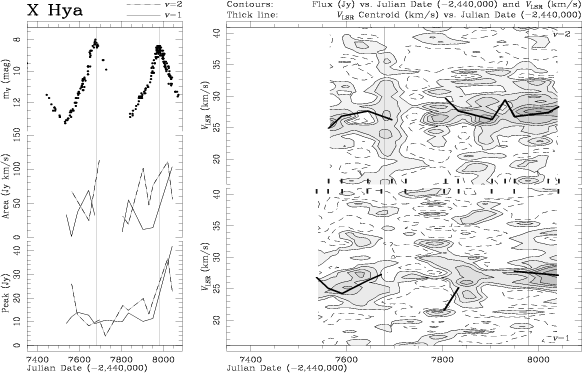 |
Figure 16: Same as Fig. 2 for the Mira variable X Hya. v=1 and v=2 contours: -2, 2, 5, 10, 15, 20, 30, and 45 Jy |
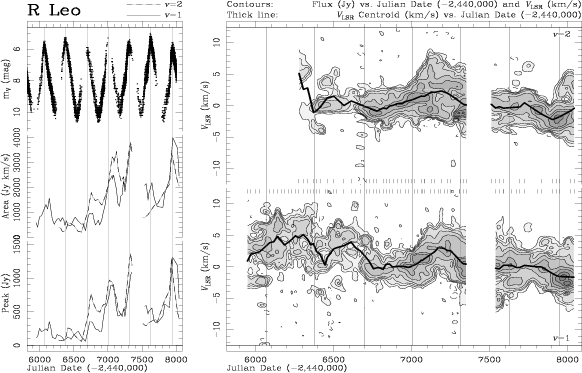 |
Figure 17: Same as Fig. 2 for the Mira variable R Leo. v=1 and v=2 contours: -20, 20, 40, 60, 100, 200, 400, 600, 1000, and 1400 Jy |
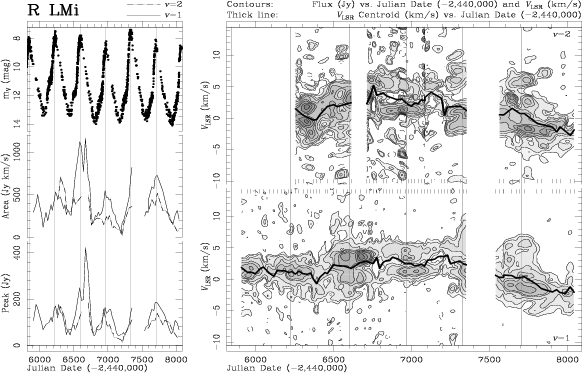 |
Figure 18: Same as Fig. 2 for the Mira variable R LMi. v=1 contours: -15, 10, 20, 40, 75, 100, 150, 200, 300, and 400 Jy. v=2 contours: -15, 5, 10, 20, 30, 50, 75, 100, 140, and 180 Jy |
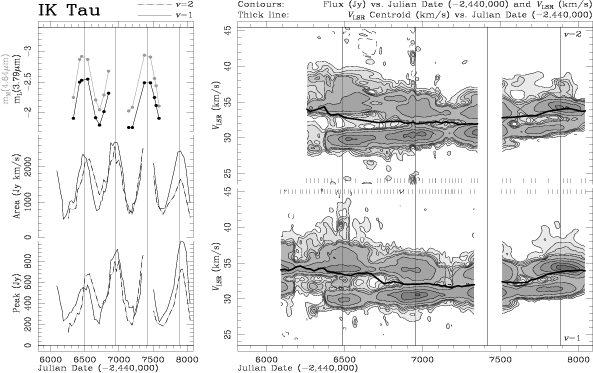 |
Figure 19: Same as Fig. 22 for the Mira variable IK Tau (NML Tau). v=1 and v=2 contours: -20, 20, 40, 60, 80, 100, 200, 400, 700, and 900 Jy. The optical magnitude of this star is very weak resulting on poor visible light curves. Thus, the plot includes NIR light curves instead of optical data |
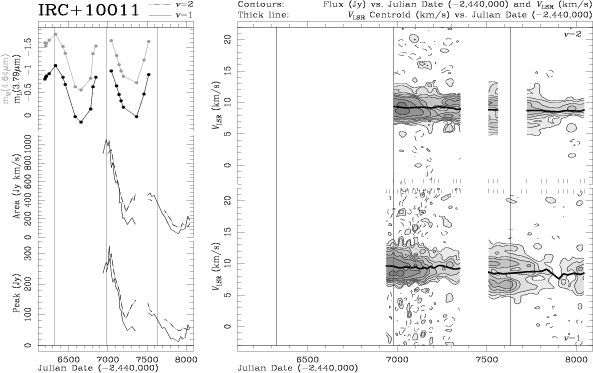 |
Figure 20: Same as Fig. 2 for the infrared source IRC +10011 (WX Psc). v=1 and v=2 contours: -10, 10, 20, 40, 60, 90, 120, 180, 250, and 350 Jy. No optical data are available for this star in the AAVSO international data base. NIR light curves corresponding to our observing period are plotted instead |
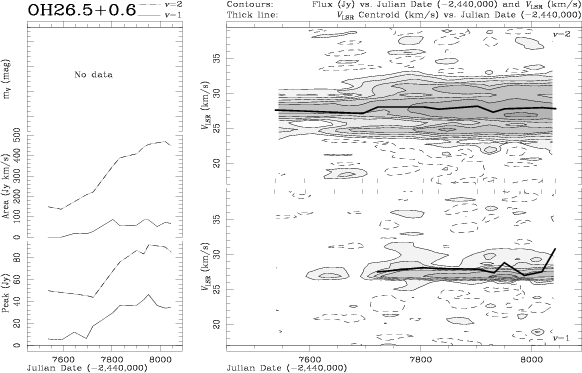 |
Figure 21: Same as Fig. 2 for the OH/IR star OH 26.5+0.6. v=1 contours: -3, 5, 10, 15, 20, 30, 40, and 55 Jy. v=2 contours: -3, 5, 10, 20, 30, 40, 60, and 90 Jy. No optical neither NIR variability curves are available for this object |
 |
Figure 22: Same as Fig. 2 for the young stellar source Orion IRc2. v=1 and v=2 contours: -20, 20, 40, 60, 100, 200, 500, 1000, 1500, and 2000 Jy. No velocity centroid curve is shown in this case |
Copyright The European Southern Observatory (ESO)